Setting powder can be a real game-changer for us with mature skin. I know the concern – you worry that powder will exaggerate fine lines or make your face look dry and cakey. I’ve been there too! Once my base is set softly like this, I love finishing with a creamy shade from my guide to the best lipsticks for mature skin so my lips look smooth instead of powdery or dry.
But when applied correctly, a good setting powder actually helps set your foundation, reduce shine, and even blur the look of pores and wrinkles. The key is using the right techniques (and the right powder) so you lock in your makeup without emphasizing texture. In this guide, I’ll walk you through my personal step-by-step process for applying setting powder on mature skin, so your makeup stays fresh all day without settling into those pesky lines.

Table of Contents
Step 1: Prep Your Skin Thoroughly Before Powder
I can’t emphasize this enough: preparation is everything. Before any powder touches your face, make sure your skin is well-moisturized and primed. Mature skin tends to be drier, so hydrating is crucial – otherwise powder might cling to dry patches. I start my routine by cleansing and applying a good moisturizer, then primer goes on after skincare. (Wondering if primer is really necessary? I break down that question in Primer 101: Do Older Women Need Primer?.) A nourishing, hydrating primer creates a smooth canvas by blurring pores and giving your foundation something to grip onto.

In fact, properly prepping your skin can make a night-and-day difference in how your makeup looks and lasts – if you need a refresher on prepping techniques, check out our full guide on How to Prep Mature Skin for Foundation.
Also, consider the base makeup you’re using. For the best results with setting powder, use a foundation that works well for mature skin – ideally one that won’t settle into wrinkles. (If you’re still searching for a great foundation, see our roundup of Top Foundations That Don’t Settle into Wrinkles for some excellent options.) With a well-chosen foundation and a properly primed face, you’re setting yourself up for success when it comes time to powder.
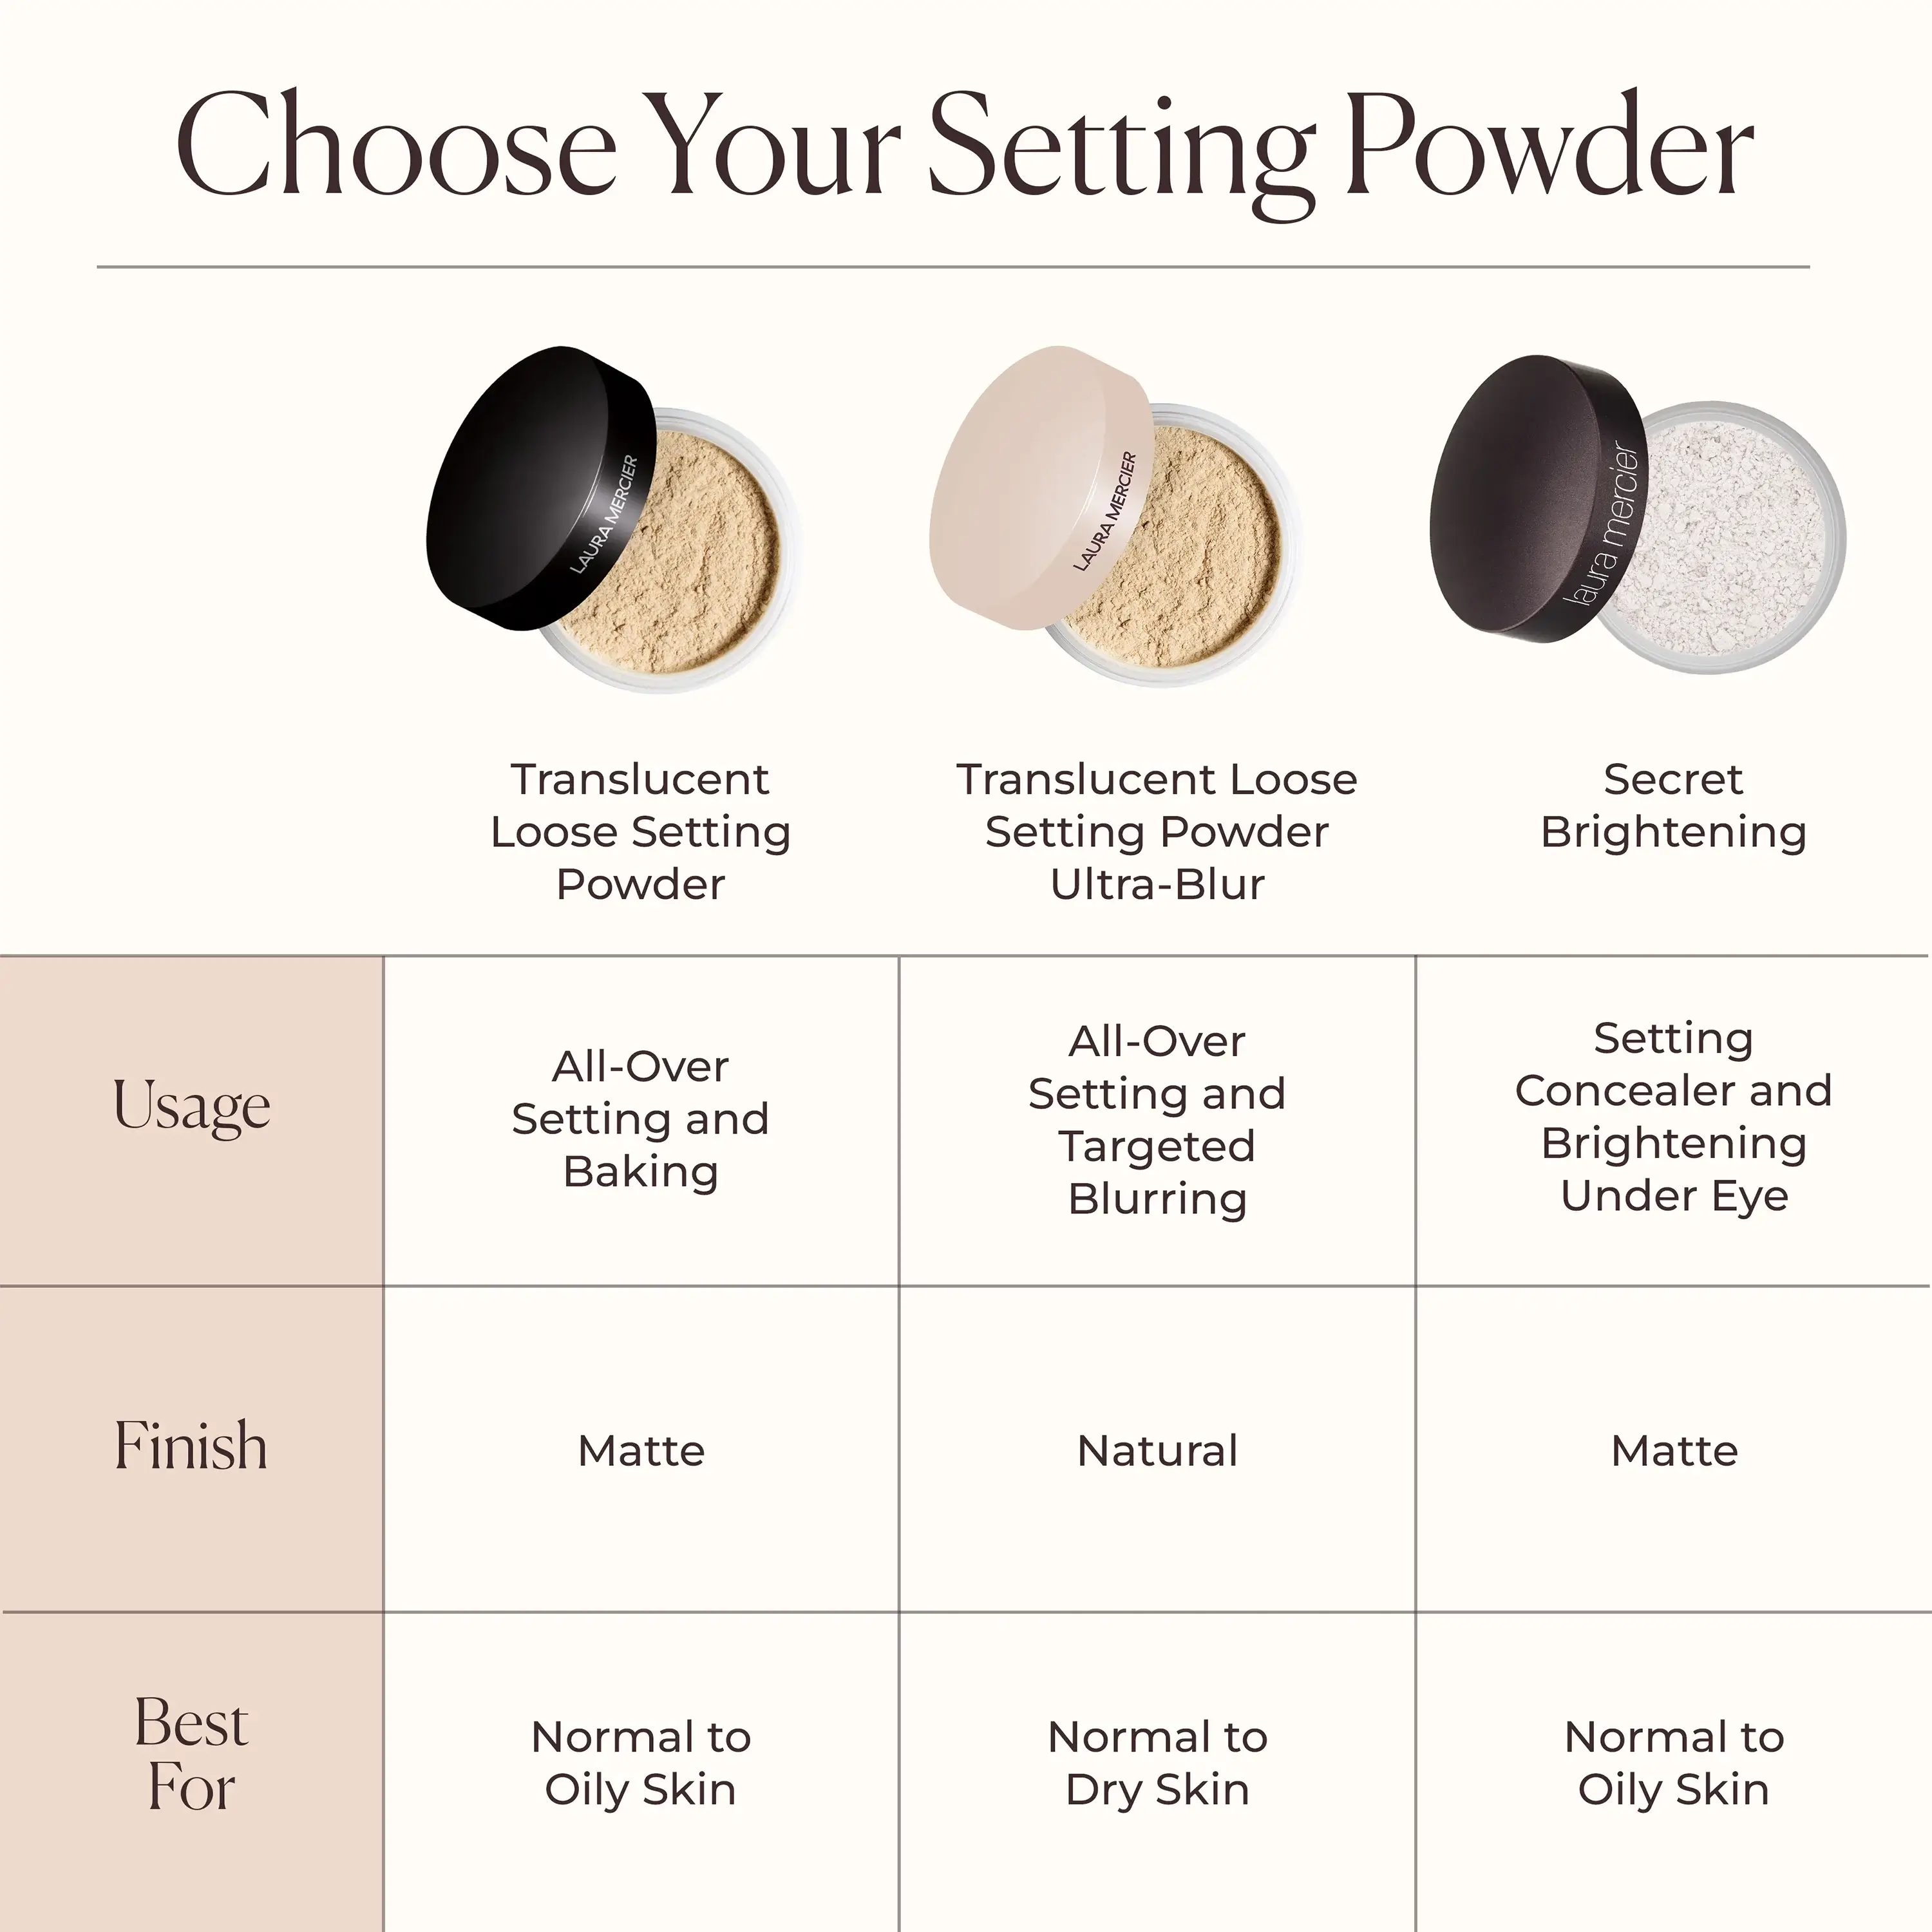
Step 2: Choose the Right Setting Powder Formula for Mature Skin
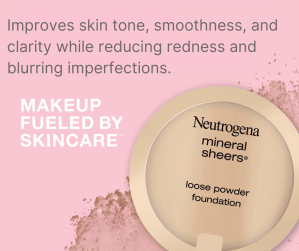
Not all powders are created equal, and the formula you pick makes a huge difference. When shopping for a setting powder, look for keywords like “hydrating,” “blurring,” or “luminous” on the label – those terms hint that the powder is designed to be forgiving on drier or textured skin. Finely milled powders are your best friend because they have a silky, lightweight texture that won’t cake up or settle into fine lines. In general, I prefer loose translucent powders for everyday use since they tend to give a softer, more natural finish on mature skin (pressed powders can work for touch-ups, but they often have more pigment and can look heavier if overdone). And pay attention to the finish: a satin or radiant finish powder will keep your complexion looking fresh, whereas a super matte powder might make your skin look flat or dry.

Quick tips for choosing a setting powder:
- Formula & Finish: Opt for lightweight, finely-milled powders labeled as hydrating, blurring, or luminous. These will smooth the skin’s appearance and avoid a chalky look. Steer clear of thick, heavy matte powders which can exaggerate dryness.
- Loose vs. Pressed: Loose powder generally provides a softer, more blendable finish (great for at-home application), while pressed powder is less messy and portable for quick touch-ups. If you use a pressed powder, apply sparingly to avoid build-up.
- Translucent vs. Tinted: Translucent powders are colorless and won’t alter your foundation shade, making them a safe bet. Tinted powders can add a hint of extra coverage or warmth, which is nice if you want it – just make sure any tint matches your skin tone so it doesn’t turn ashy or too dark.
For example, one of my go-to loose powders is the Laura Mercier Translucent Loose Setting Powder – it’s a cult favorite for a reason. It’s so finely milled and lightweight that it sets my makeup without caking (I even wrote a full review of the Laura Mercier powder if you’re curious about the details).
On days when I want a bit of glow, I reach for the Hourglass Veil Translucent Setting Powder, which has a subtle radiant finish that keeps the skin from looking dull (though it’s a splurge, as I mention in my Hourglass review). Whatever powder you choose, just remember: the right formula will enhance your complexion, not mask it. If you need more ideas, you can also check out our roundup of the Best Setting Powders for Mature Skin for some tested recommendations at various price points.
Step 3: Apply with a Light Hand (Less Is More!)
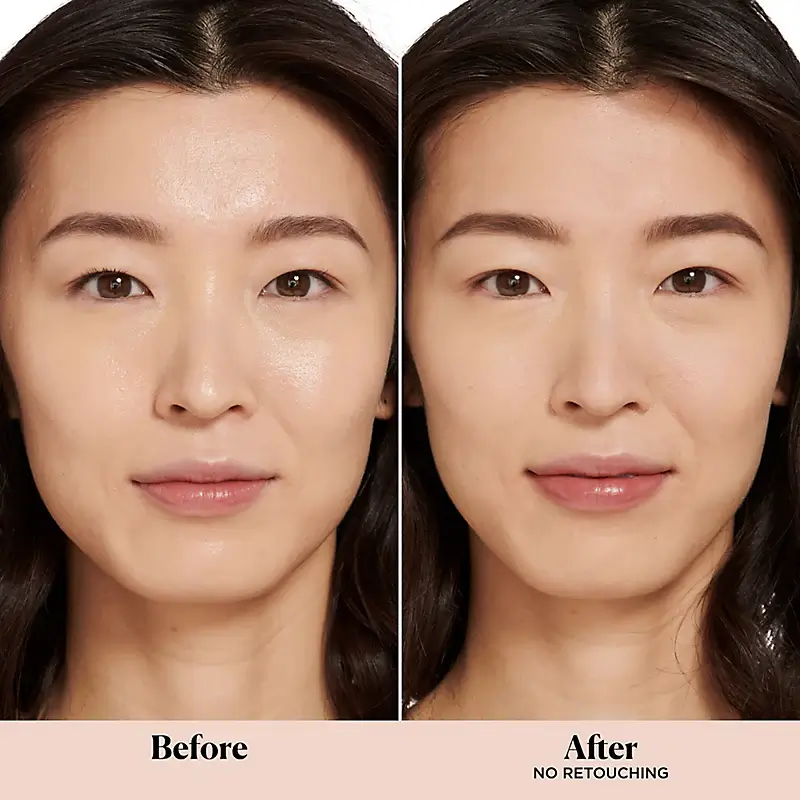
Now for the application itself – the golden rule here is use a light touch. When applying setting powder on mature skin, a little goes a long way. Overdoing it is a common mistake (one of the biggest makeup mishaps I see is when people pile on too much powder and end up with a cakey finish that actually ages them). Remember, the goal is to set your makeup, not to mattify your face into oblivion.
Before you apply powder, here’s a pro tip: make sure your foundation and concealer are blended nicely and haven’t settled into lines yet. Not sure when powder should go on (and what should be underneath it)? Here’s the full makeup layering routine in order. If you notice creasing (for example, concealer gathering in an under-eye wrinkle), tap it out with your finger or a sponge before you set it with powder. Once you add powder on top, that crease isn’t going anywhere! Taking a second to smooth everything out ensures you’re setting a flawless base.
Here’s my method:
- Pick up a small amount of powder: Gently dip your brush into the powder (if it’s loose powder, I often tap a bit into the lid first). Then tap off the excess by lightly flicking the brush. You want just a light dusting on the bristles – no visible clumps of powder.
- Press or sweep lightly on key areas: Instead of vigorously buffing powder all over, target the areas that actually need it. Typically, I focus on the T-zone (forehead, nose, and chin), a bit around the nose where foundation might crease, and lightly on the under-eye area to set concealer. Use a gentle pressing or patting motion with the brush rather than a hard swipe. This way you avoid disturbing your foundation and you deposit less product. I sometimes even press the powder in by rolling the side of the brush or using a damp makeup sponge to lightly press powder especially in areas like under the eyes.
- Blend out any excess: If you see any obvious powder sitting on the surface, take a clean brush and softly sweep it across your face to remove the extra. The end result should look like your skin, just a bit more matte in the right places, not a dusty mask.


The tools you use can also affect the outcome. As mentioned, I prefer a big fluffy brush for most of the face because it disperses powder lightly. For smaller areas or if I want more precision (like pressing powder into the corners of the nose or under eyes), a damp beauty sponge works wonders. (Using the right brushes or sponges can make a difference – if you’re curious about the best tools, see our guide on the top foundation brushes and sponges for mature skin to find ones that give an airbrushed finish without settling.)
Above all, don’t over-powder. It’s better to start with a tiny amount, then if needed, you can add a touch more to, say, your nose or forehead later. You’ll be surprised how just a light dusting can set your makeup. As one makeup artist wisely put it, “Less is more: a lot of powder can look cakey and create more cracks and creases.” And none of us want that, right?
Step 4: Set the Under-Eye Area Gently (No Baking!)
The under-eye area often deserves special mention because the skin there is delicate and tends to have fine lines. If you wear concealer under your eyes, you’ll want to set it so it doesn’t crease throughout the day – but you must do this very carefully for mature skin. I avoid the heavy “baking” technique (where you pack on lots of powder and let it sit); that might work for 20-somethings on Instagram, but on our skin it can backfire and look terribly dry.
Instead, use a minimal amount of powder under the eyes. One technique I swear by is using a damp sponge or a very small, soft brush:
- Pick up just a tiny bit of powder (really, just a smidge).
- Press it gently under the eyes, concentrating on where you see creasing (usually right in any fine lines or where the eye area is moist from concealer).
- Do not sweep it back and forth too much; a gentle press-and-roll motion works well to lay the powder down without caking. For more on selecting the right concealer formula and shade, read my how‑to guide
This sets the concealer in place and helps blur the fine lines, but it avoids that dry, crepey look. If you struggle with concealer looking dry or cracking under the eyes, double-check that you’re using a hydrating concealer formula too – that can make a big difference (we’ve curated some of our favorite best concealers for mature skin that stay creamy and crease-resistant). And remember, less is more here as well. You can always add a touch more later, but it’s almost impossible to undo an over-powdered, creased-up under-eye once it’s happened.
One more tip: after setting, if your under-eyes look a bit powdery, you can take a clean finger or a setting spray (more on that next) and lightly tap to melt the powder in. The goal is to prevent concealer creasing without making the area look dry – a fine balance, but absolutely achievable with a light hand and the right product.
Step 5: Finish with a Setting Spray for a Natural Finish
After you’ve lightly powdered the areas of your face that need it, a great way to bring everything together is to use a setting spray as the final step. This is my secret weapon to make the powder melt into the skin and take away any “powdery” appearance. A few spritzes of a good makeup setting spray will lock in your look even further (hello, all-day wear!) and it also adds a bit of moisture back onto the top layer of your makeup, which helps keep your skin from looking too dry or flat. I personally prefer a hydrating or glowy setting spray for mature skin – something with a fine mist that won’t leave big droplets. Hold it about 8-12 inches away and give your face an even misting.

What I love about this finishing step is that it makes all the difference in achieving that skin-like finish. Suddenly, any trace of powder disappears, and your makeup looks like it’s one with your skin, rather than sitting on top. If you’ve never tried a setting spray after powder, you might be surprised at the result – it truly can make your makeup look more fresh and dewy (in a good way, not shiny!).
At this point, your makeup is set to last. If you wear powder blush or bronzer, you can certainly apply those after setting powder (they’ll glide on better over a set base). Then give a final spritz of setting spray to set everything, blush and all. (Choosing flattering blush and bronzer shades is another topic on its own – for some ideas, see our guide to the best blushes and bronzers for mature skin to keep your glow looking natural.)
Now take a look in the mirror: you should see a smoother complexion with your foundation and concealer locked in place, and no obvious powder visible. Your face shouldn’t look dry or overly matte – just softly polished. That’s the power of a well-applied setting powder combined with the right prep and finish!
Join the GlowOver50 Newsletter ✨
Stay in the loop with my latest makeup tips, skincare secrets, and honest product reviews — all tailored for women over 50. Subscribe today and keep that gorgeous glow going!
FAQs: Common Questions About Setting Powder on Mature Skin
Q: Can setting powder make mature skin look dry or cakey?
A: It can if you apply too much or use the wrong kind of powder, yes. On mature skin, heavy powder tends to settle into lines and absorb all the moisture, which leaves a dry, cakey appearance.
The good news is that won’t happen if you follow the steps above: moisturize well first, choose a finely-milled hydrating powder, and use just a light dusting where needed. I always stress that you should avoid over-powdering – focus on areas that get oily or where makeup moves. When used properly, a setting powder will actually help blur the skin’s texture a bit and prevent that mid-day makeup creasing, instead of making you look dry. This happens even more in cold weather—my full winter makeup guide is here: Best Winter Makeup for Mature Skin.
Q: Should I apply setting powder all over my face?
A: No, you definitely don’t need to put powder everywhere (and doing so can make your skin look flat).
I only powder the areas that truly need it – usually my T-zone, around the nose, a touch on the chin, and lightly under the eyes. If your cheeks don’t get oily or your makeup isn’t slipping there, you can skip them. The idea is to strategically set the makeup. By being precise, you keep a bit of natural dew on the areas that don’t need mattifying, which keeps your overall look more youthful. Less powder overall means less chance of it looking dry. (Bonus tip: Having a great foundation underneath also helps – if your foundation is suited for mature skin and long-wearing, you won’t feel the need to powder every inch. For some excellent foundation options, check out our Best Foundations for Mature Skin guide.)
Q: What’s the best way to apply setting powder on mature skin?
A: The best method I’ve found is using a fluffy brush (for broad areas) and a damp sponge (for targeted setting), with a very light touch.
First, ensure your skin is prepped and your foundation/concealer are applied and blended nicely. Then pick up a tiny amount of powder, tap off excess, and gently press it onto the areas you want to set (instead of aggressively buffing). For example, I’ll lightly press powder on my forehead, nose, and chin, and use the damp sponge to set under my eyes delicately. This pressing technique helps avoid disturbing your makeup and prevents the powder from sitting in a thick layer. Always remember: a thin veil of powder is usually enough to do the job. The result should be a smooth, shine-free finish that doesn’t scream “I’m wearing powder!”
Q: Does setting powder really help makeup last longer on mature skin?
A: Absolutely – that’s one of its main benefits.
As long as you’re using a good powder and the right amount, it will act as a safeguard against your foundation and concealer fading or moving into lines over the day. I notice a big difference in longevity when I set my makeup lightly with powder versus when I skip it. It’s especially helpful for preventing concealer from creasing under the eyes and for keeping shine at bay in the T-zone. Just be sure to use a hydrating setting powder or at least one that isn’t overly mattifying, because you want to extend your makeup wear without drying out your skin. And of course, finishing with a setting spray adds an extra insurance policy for longevity.
Q: Should I use a translucent powder or a tinted powder?
A: This depends on your preference and skin needs.
Translucent powders are a go-to for many because they are colorless and just set your makeup without changing the shade of your foundation – super convenient and no risk of a mismatch. They’re great if you’re happy with your foundation’s coverage and just want to lock it in. Tinted powders, on the other hand, offer a hint of coverage or color. They can be nice if you want to add a touch more coverage to your look or warmth to your complexion. For instance, a softly tinted powder can slightly even out skin tone. On my mature skin, I usually lean towards translucent because it’s lightweight and foolproof. But I do use a tinted powder now and then when I want to keep things very simple (like just moisturizer, a light coverage powder, and go). If you do choose a tinted powder, make sure the shade is a good match and that the formula is just as fine and lightweight as a translucent one. Either way, aim for those radiant or luminous finishes we talked about, so your skin doesn’t end up looking dull.
What’s Next?
Now that you know how to apply setting powder the right way, you can confidently incorporate it into your makeup routine for a shine-free, long-lasting look that doesn’t emphasize those fine lines. Makeup is all about experimenting to find what makes you feel beautiful, so don’t be afraid to adjust the techniques to suit your personal preferences.
For further reading, if you’re interested in lighter coverage options (especially for casual days), check out our guides on the best tinted moisturizers for mature skin and the top BB & CC creams for mature skin. These can give you a fresh-faced look with just a hint of coverage – and you can still set them with a touch of powder using the tips from this guide for extra staying power. Also, be sure to see our advice on avoiding common foundation mistakes that tend to trip up those of us with mature skin (so you can have the perfect base before you even reach for your setting powder).
With the right prep, the right products, and the right technique, setting powder can truly become a friend to your mature skin – keeping your makeup in place and you looking fresh all day. Happy makeup applying, and stay glowing over 50!